Workflow for Developers
In the present document, we refer to the Astropy master branch, as the trunk.
Creating a fork
You need to do this only once for each package you want to contribute to. The instructions here are very similar to the instructions at http://help.github.com/fork-a-repo/ — please see that page for more details. We’re repeating some of it here just to give the specifics for the Astropy project, and to suggest some default names.
Set up and configure a GitHub account
If you don’t have a GitHub account, go to the GitHub page, and make one.
You then need to configure your account to allow write access — see the Generating SSH keys help on GitHub Help.
Create your own fork of a repository
The following example shows how to fork the core astropy repository, but the same applies to other packages:
Log into your GitHub account.
Go to the Astropy GitHub home.
Click on the fork button:

Now, after a short pause and some ‘Hardcore forking action’, you should find yourself at the home page for your own forked copy of Astropy.
Setting up the fork to work on
Overview
This is done using:
git clone git@github.com:your-user-name/astropy.git
cd astropy
git remote add upstream git://github.com/astropy/astropy.git
In detail
Clone your fork to the local computer:
git clone git@github.com:your-user-name/astropy.git
Change directory to your new repo:
cd astropy
Then type:
git branch -a
to show you all branches. You’ll get something like:
* master
remotes/origin/master
This tells you that you are currently on the master branch, and that you also have a remote connection to origin/master. What remote repository is remote/origin? Try git remote -v to see the URLs for the remote. They will point to your GitHub fork.
Now you want to connect to the Astropy repository, so you can merge in changes from the trunk:
cd astropy
git remote add upstream git://github.com/astropy/astropy.git
upstream here is just the arbitrary name we’re using to refer to the main Astropy repository.
Note that we’ve used git:// for the URL rather than git@. The git:// URL is read only. This means we that we can’t accidentally (or deliberately) write to the upstream repo, and we are only going to use it to merge into our own code.
Just for your own satisfaction, show yourself that you now have a new ‘remote’, with git remote -v show, giving you something like:
upstream   git://github.com/astropy/astropy.git (fetch)
upstream   git://github.com/astropy/astropy.git (push)
origin     git@github.com:your-user-name/astropy.git (fetch)
origin     git@github.com:your-user-name/astropy.git (push)
Your fork is now set up correctly, and you are ready to hack away.
Workflow summary
This section gives a summary of the workflow once you have successfully forked the repository, and details are given for each of these steps in the following sections.
- Don’t use your master branch for anything. Consider deleting it.
- When you are starting a new set of changes, fetch any changes from the trunk, and start a new feature branch from that.
- Make a new branch for each separable set of changes — “one task, one branch” (ipython git workflow).
- Name your branch for the purpose of the changes - e.g. bugfix-for-issue-14 or refactor-database-code.
- If you can possibly avoid it, avoid merging trunk or any other branches into your feature branch while you are working.
- If you do find yourself merging from the trunk, consider Rebasing on trunk
- Ask on the astropy-dev mailing list if you get stuck.
- Ask for code review!
This way of working helps to keep work well organized, with readable history. This in turn makes it easier for project maintainers (that might be you) to see what you’ve done, and why you did it.
See linux git workflow and ipython git workflow for some explanation.
Deleting your master branch
It may sound strange, but deleting your own master branch can help reduce confusion about which branch you are on. See deleting master on github for details.
Updating the mirror of trunk
From time to time you should fetch the upstream (trunk) changes from GitHub:
git fetch upstream
This will pull down any commits you don’t have, and set the remote branches to point to the right commit. For example, ‘trunk’ is the branch referred to by (remote/branchname) upstream/master - and if there have been commits since you last checked, upstream/master will change after you do the fetch.
Making a new feature branch
When you are ready to make some changes to the code, you should start a new branch. Branches that are for a collection of related edits are often called ‘feature branches’.
Making an new branch for each set of related changes will make it easier for someone reviewing your branch to see what you are doing.
Choose an informative name for the branch to remind yourself and the rest of us what the changes in the branch are for. For example add-ability-to-fly, or buxfix-for-issue-42.
# Update the mirror of trunk
git fetch upstream

# Make new feature branch starting at current trunk
git branch my-new-feature upstream/master
git checkout my-new-feature
Generally, you will want to keep your feature branches on your public GitHub fork. To do this, you git push this new branch up to your github repo. Generally (if you followed the instructions in these pages, and by default), git will have a link to your GitHub repo, called origin. You push up to your own repo on GitHub with:
git push origin my-new-feature
In git >= 1.7 you can ensure that the link is correctly set by using the --set-upstream option:
git push --set-upstream origin my-new-feature
From now on git will know that my-new-feature is related to the my-new-feature branch in the GitHub repo.
The editing workflow
Overview
git add my_new_file
git commit -am 'NF - some message'
git push
In more detail
Make some changes
See which files have changed with git status (see git status). You’ll see a listing like this one:
# On branch ny-new-feature
# Changed but not updated:
#   (use "git add <file>..." to update what will be committed)
#   (use "git checkout -- <file>..." to discard changes in working directory)
#
#    modified:   README
#
# Untracked files:
#   (use "git add <file>..." to include in what will be committed)
#
#    INSTALL
no changes added to commit (use "git add" and/or "git commit -a")
Check what the actual changes are with git diff (git diff).
Add any new files to version control git add new_file_name (see git add).
Add any modified files that you want to commit using git add modified_file_name (see git add).
Once you are ready to commit, check with git status which files are about to be committed:
# Changes to be committed:
#   (use "git reset HEAD <file>..." to unstage)
#
#    modified:   README
Then use git commit -m 'A commit message'. The m flag just signals that you’re going to type a message on the command line. The git commit manual page might also be useful.
To push the changes up to your forked repo on GitHub, do a git push (see git push).
Asking for your changes to be reviewed or merged
When you are ready to ask for someone to review your code and consider a merge:
Go to the URL of your forked repo, say http://github.com/your-user-name/astropy.
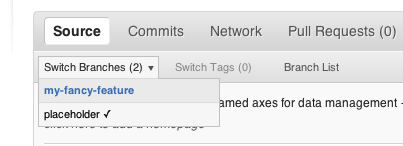
Use the ‘Switch Branches’ dropdown menu near the top left of the page to select the branch with your changes:
Click on the ‘Pull request’ button:

Enter a title for the set of changes, and some explanation of what you’ve done. Say if there is anything you’d like particular attention for - like a complicated change or some code you are not happy with.
If you don’t think your request is ready to be merged, just say so in your pull request message. This is still a good way of getting some preliminary code review.
Some other things you might want to do
Delete a branch on GitHub
# change to the master branch (if you still have one, otherwise change to
# another branch)
git checkout master

# delete branch locally
git branch -D my-unwanted-branch

# delete branch on GitHub
git push origin :my-unwanted-branch
(Note the colon : before test-branch. See also: http://github.com/guides/remove-a-remote-branch
Several people sharing a single repository
If you want to work on some stuff with other people, where you are all committing into the same repository, or even the same branch, then just share it via GitHub.
First fork Astropy into your account, as from Creating a fork.
Then, go to your forked repository GitHub page, say http://github.com/your-user-name/astropy
Click on the ‘Admin’ button, and add anyone else to the repo as a collaborator:
Now all those people can do:
git clone git@githhub.com:your-user-name/astropy.git
Remember that links starting with git@ use the ssh protocol and are read-write; links starting with git:// are read-only.
Your collaborators can then commit directly into that repo with the usual:
git commit -am 'ENH - much better code'
git push origin master # pushes directly into your repo
Explore your repository
To see a graphical representation of the repository branches and commits:
gitk --all
To see a linear list of commits for this branch:
git log
You can also look at the network graph visualizer for your GitHub repo.
Finally the Fancy log output lg alias will give you a reasonable text-based graph of the repository.
Rebasing on trunk
Let’s say you thought of some work you’d like to do. You Updating the mirror of trunk and Making a new feature branch called cool-feature. At this stage trunk is at some commit, let’s call it E. Now you make some new commits on your cool-feature branch, let’s call them A, B, C. Maybe your changes take a while, or you come back to them after a while. In the meantime, trunk has progressed from commit E to commit (say) G:
      A---B---C cool-feature
     /
D---E---F---G trunk
At this stage you consider merging trunk into your feature branch, and you remember that this here page sternly advises you not to do that, because the history will get messy. Most of the time you can just ask for a review, and not worry that trunk has got a little ahead. But sometimes, the changes in trunk might affect your changes, and you need to harmonize them. In this situation you may prefer to do a rebase.
Rebase takes your changes (A, B, C) and replays them as if they had been made to the current state of trunk. In other words, in this case, it takes the changes represented by A, B, C and replays them on top of G. After the rebase, your history will look like this:
              A'--B'--C' cool-feature
             /
D---E---F---G trunk
See rebase without tears for more detail.
To do a rebase on trunk:
# Update the mirror of trunk
git fetch upstream

# Go to the feature branch
git checkout cool-feature

# Make a backup in case you mess up
git branch tmp cool-feature

# Rebase cool-feature onto trunk
git rebase --onto upstream/master upstream/master cool-feature
In this situation, where you are already on branch cool-feature, the last command can be written more succinctly as:
git rebase upstream/master
When all looks good you can delete your backup branch:
git branch -D tmp
If it doesn’t look good you may need to have a look at Recovering from mess-ups.
If you have made changes to files that have also changed in trunk, this may generate merge conflicts that you need to resolve - see the git rebase man page for some instructions at the end of the “Description” section. There is some related help on merging in the git user manual - see resolving a merge.
If your feature branch is already on GitHub and you rebase, you will have to force push the branch; a normal push would give an error. If the branch you rebased is called cool-feature and your GitHub fork is available as the remote called origin, you use this command to force-push:
git push -f origin cool-feature
Note that this will overwrite the branch on GitHub, i.e. this is one of the few ways you can actually lose commits with git. Also note that it is never allowed to force push to the main astropy repo (typically called upstream), because this would re-write commit history and thus cause problems for all others.
Recovering from mess-ups
Sometimes, you mess up merges or rebases. Luckily, in git it is relatively straightforward to recover from such mistakes.
If you mess up during a rebase:
git rebase --abort
If you notice you messed up after the rebase:
# Reset branch back to the saved point
git reset --hard tmp
If you forgot to make a backup branch:
# Look at the reflog of the branch
git reflog show cool-feature

8630830 cool-feature@{0}: commit: BUG: io: close file handles immediately
278dd2a cool-feature@{1}: rebase finished: refs/heads/my-feature-branch onto 11ee694744f2552d
26aa21a cool-feature@{2}: commit: BUG: lib: make seek_gzip_factory not leak gzip obj
...

# Reset the branch to where it was before the botched rebase
git reset --hard cool-feature@{2}
Rewriting commit history
Note
Do this only for your own feature branches.
There’s an embarrassing typo in a commit you made? Or perhaps the you made several false starts you would like the posterity not to see.
This can be done via interactive rebasing.
Suppose that the commit history looks like this:
git log --oneline
eadc391 Fix some remaining bugs
a815645 Modify it so that it works
2dec1ac Fix a few bugs + disable
13d7934 First implementation
6ad92e5 * masked is now an instance of a new object, MaskedConstant
29001ed Add pre-nep for a copule of structured_array_extensions.
...
and 6ad92e5 is the last commit in the cool-feature branch. Suppose we want to make the following changes:
- Rewrite the commit message for 13d7934 to something more sensible.
- Combine the commits 2dec1ac, a815645, eadc391 into a single one.
We do as follows:
# make a backup of the current state
git branch tmp HEAD
# interactive rebase
git rebase -i 6ad92e5
This will open an editor with the following text in it:
pick 13d7934 First implementation
pick 2dec1ac Fix a few bugs + disable
pick a815645 Modify it so that it works
pick eadc391 Fix some remaining bugs

# Rebase 6ad92e5..eadc391 onto 6ad92e5
#
# Commands:
#  p, pick = use commit
#  r, reword = use commit, but edit the commit message
#  e, edit = use commit, but stop for amending
#  s, squash = use commit, but meld into previous commit
#  f, fixup = like "squash", but discard this commit's log message
#
# If you remove a line here THAT COMMIT WILL BE LOST.
# However, if you remove everything, the rebase will be aborted.
#
To achieve what we want, we will make the following changes to it:
r 13d7934 First implementation
pick 2dec1ac Fix a few bugs + disable
f a815645 Modify it so that it works
f eadc391 Fix some remaining bugs
This means that (i) we want to edit the commit message for 13d7934, and (ii) collapse the last three commits into one. Now we save and quit the editor.
Git will then immediately bring up an editor for editing the commit message. After revising it, we get the output:
[detached HEAD 721fc64] FOO: First implementation
 2 files changed, 199 insertions(+), 66 deletions(-)
[detached HEAD 0f22701] Fix a few bugs + disable
 1 files changed, 79 insertions(+), 61 deletions(-)
Successfully rebased and updated refs/heads/my-feature-branch.
and the history looks now like this:
0f22701 Fix a few bugs + disable
721fc64 ENH: Sophisticated feature
6ad92e5 * masked is now an instance of a new object, MaskedConstant
If it went wrong, recovery is again possible as explained above.
Converting a GitHub issue to a pull request
Sometimes you have a branch in your own GitHub repository designed to fix one particular issue. If that issue is listed on GitHub, a natural way to address it is to convert the issue to a pull request by attaching code with the fix to the issue. This can currently only be done using the GitHub API (there’s no button or anything on the web site that does it, at least as of 2/6/2012). There are two options to do this:
You can use the script at https://gist.github.com/1750715 which will do this for you automatically - just download the script and run it as a python command-line script, using the python issue2pr.py --help option to determine the precise usage.
You can use the hub command-line utility provided here by GitHub. Once installed, you can attach a branch to a pull request by doing:
hub pull-request -i <ID> -b astropy:master -h <USER>:<BRANCH>
where <ID> is the ID of the issue, <USER> is the username, and <BRANCH> is the name of the branch you want to attach to the issue. For example:
hub pull-request -i 42 -b astropy:master -h galahad:feature
will attach the feature branch from galahad‘s Astropy repository to issue 42.
The hub command can do a lot more to interact with GitHub, so be sure to read their documentation. For example, you can fetch all branches of a repository for a given user by doing:
hub fetch <USER>